

This section is written to assist people in the contribution to or takeover of the CPI pilot project. Hopefully, this pilot reaches expectations and can aquire more funding allowing it to move into the development stage. New developers to this project should first read the User Guide and Administration Guide to familiarise themselves with the project before proceeding as this section builds on the first two.
This documentation is written using Sphinx, a python documentation generator. All modules, classes and functions are commented using docstrings and these follow the conventions described in PEP 257 Docstring Conventions. A Sphinx extension, sphinx.ext.autodoc, pulls in the docstrings from the modules, classes and functions and processes any Sphinx markup found within. This allows documentation to be stored in a single location and avoids duplication. It also allows any code changes to be followed up by an immediete documentation update in the same location as the code change.
Coding follows the PEP 8 Style Guide for Python Code.
There is no need to repeat here what is answered many times over elsewhere. In general, whenever a topic is well documented in the official documentation it will be reffered to rather than repeated here. Django is a high-level Python web-framework that allows rapid web development. Django has extensive official documentation and a large and growing amount of community support. Webmonkey provides a pretty good guide for getting started with django.
For someone with little to no web-development skills like myself, Django seemed very well documented and it’s decoupled nature (model, view, controller framework) appealed to my coding sense. My group leader, Wolfgang Huber, also showed some interest in using a web-framework that was Python based as it is object-oriented and well renowned for allowance of maintainable code development.
The CPI Pilot project folder (cpipilot - downloadable here) is simply a collection of settings for this instance of Django to run. The settings include database configuration and indicates which applications the project uses. These configuration details are stored in a settings.py module at the root level of the cpipilot folder. Along with the project configuration, a description of where the browsers URL requests are directed is stored in the urls.py module at the root level of the cpipilot folder.
The CPI Pilot project folder includes a custom built application, repository, which does most of the work. The repository application consists of four main contributing modules and follows the standard Django application setup. These are described in summary below and in more detail a little further down:
Another custom built application that was used for a while but has now been taken offline is the feedback application that was intended for anonymous user feedback. The feedback aoplication was no longer required since the project had been posted on the web-based source code repository, SourceForge, which includes these features at a higher level of detail. The feedback application may be modified for other purposes so it has been left inside the project folder.
The project uses an external application called pagination to handle the separation of long lists into sublists of objects that are viewable in a single page. pagination also takes care of the navigation between these single pages. The current version of the pagination application in use at the moment is actually a hybrid formed from two external pagination applications. The HTML templates from the one were preffered so they were incorporated into the other.
A summarized high-level description on how the framework does it’s business follows below:
For a more in-depth description on how a users browser request works see James Bennett’s blog post on how Django processes a request.
Please consult the full list of the available Django settings for a deeper understanding of this section. Some of the more important parts of the configuration module for the CPI Pilot, settings.py, are explained below:
import os.path
PROJECT_DIR = os.path.dirname(__file__)
PROJECT_DIR now contains the full path of your project folder and can be used elsewhere in the settings.py module so that your project may be moved around the system without you having to worry about changing any troublesome hard-coded paths.
DEBUG = True
turns on debug mode allowing the browser user to see project settings and temporary variables.
ADMINS = ( ('Daniel Murrell', 'daniel.murrell@ebi.ac.uk') )
sends all errors from the production server to the admin’s email address.
DATABASE_ENGINE = 'mysql'
DATABASE_NAME = 'dev'
DATABASE_USER = 'user'
DATABASE_PASSWORD = 'password'
DATABASE_HOST = 'mysql-cpipilot'
DATABASE_PORT = '4199'
sets up the options required for Django to connect to your database.
MEDIA_ROOT = os.path.join(PROJECT_DIR, 'media')
tells Django where to find your media files such as images that the HTML templates might use.
ROOT_URLCONF = 'cpipilot.urls'
tells Django to start finding URL matches at in the urls.py module in the cpipilot project folder.
TEMPLATE_DIRS = ( os.path.join(PROJECT_DIR, 'templates'), )
tells Django where to find your HTML template files.
 INSTALLED_APPS = (
'django.contrib.auth',
'django.contrib.contenttypes',
'django.contrib.sessions',
'django.contrib.sites',
'django.contrib.admin',
'cpipilot.repository',
'cpipilot.feedback',
'pagination',
)
tells Django which applications (custom and external) to use in your project. The custom applications, cpipilot.repository and cpipilot.feedback are stored in the project folder. Along with these custom applications, the project uses many base Django applications (django.contrib.*s above) which assist in the in-built admin server as well as the before mentioned pagination application.
Please consult the official documentation on Models for a deeper understanding of this section. The models defined in models.py uniquely relate to tables in the database. There are essentially two different types of models. Models that describe and relate to phisical entities in the experiments and models that form relationships between these entity models (at the moment, exclusively many-to-many relationships).
Entity models together with incredibly brief descriptions are listed below:
For more in-depth descriptions of these entities please see CPI pilot definitions or follow the definition link through the individual model descriptions linked to above.
Relationship models include the following:
The defined URL patterns for the CPI Pilot project are divided into URL patterns specific to the project and URL patterns specific to the applications. For more information on how the pattern matching syntax work or how to write your own url patterns please consult Django’s URL Dispatcher documentation.
The URL patterns specific to the project are applied in the urls.py file that is stored in the project directory cpipilot. The code segments that add these URL patterns aren’t lengthy and are shown below:
urlpatterns = patterns('',
  (r'^debug/$', views.debug),
  (r'^admin/(.*)', admin.site.root),
  (r'^repository/', include('cpipilot.repository.urls')),
)
In order these patterns achive the following:
and:
urlpatterns += patterns('django.views.generic.simple',
  url(r'^$', 'direct_to_template', {'template': 'home.html'}, name="root"),
  url(r'^home/$', 'direct_to_template', {'template': 'home.html'}, name="home"),
  url(r'^downloads/$', 'direct_to_template', {'template': 'downloads.html'}, name="downloads"),
  url(r'^contact/$', 'direct_to_template', {'template': 'contact.html'}, name="contact"),
)
These are project specific ‘menu’ type URL patterns that invoke the use of Django’s generic views to return specific HTML templates without going through a view function. View functions are not needed here because no variables need to be passed through to the HTML templates in these cases.
The URL patterns specific to the repository application are applied in the /repository/urls.py file in the repository application folder. The code segment that adds these URL patterns isn’t lengthy either and is shown below:
urlpatterns = patterns('',
  # search pattern
  url(r'^search/$', views.search, name="search"),

  # gene specific patterns
  url(r'^geneSingle/(\d+)/$', views.geneSingle, name="geneSingle"),

  # target specific patterns
  url(r'^targetSingle/(\d+)/$', views.targetSingle, name="targetSingle"),

  # reagent specific patterns
  url(r'^reagentSingle/(\d+)/$', views.reagentSingle, name="reagentSingle"),

  # imageSet specific patterns
  url(r'^imageSetSingle/(\d+)/$', views.imageSetSingle, name="imageSetSingle"),

  # experiment specific patterns
  url(r'^experimentSingle/(\d+)/$', views.experimentSingle, name="experimentSingle"),
  url(r'^experimentsAll/$', views.experimentsAll, name="experimentsAll"),
  url(r'^experimentDownload/(\d+)$', views.experimentDownload, name="experimentDownload"),

  # phenotype specific patterns
  url(r'^phenotypeToGene/(\d+)/$', views.phenotypeToGene, name="phenotypeToGene"),
  url(r'^phenotypeToReagent/(\d+)/$', views.phenotypeToReagent, name="phenotypeToReagent"),
  url(r'^phenotypeGeneLinkage/(\d+)/(\d+)$', views.phenotypeGeneLinkage, name="phenotypeGeneLinkage"),
)
The views.search function uses GET data from an HTML form but in all the other URL patterns an id parameter for the view function is extracted from the URL. This id is used to find the relevant database entity by matching the id parameter to the automatically incrementing id column that Django creates in all it’s database tables when no primary key is defined in the corresponding model.
As an example, given the full URL http://wwwdev.ebi.ac.uk/huber-srv/cpipilot/repository/phenotypeGeneLinkage/89/8496, the repository URL extension to the site URL would include the URL patterns of the repository application and the additional phenotypeGeneLinkage/89/8496 URL extension would be matched with the last pattern in the code shown above. The 89 would be extracted and supply the first parameter of the views.phenotypeGeneLinkage function which is phenotypeID and the 8496 would be extracted and supply the second parameter for the views.phenotypeGeneLinkage function which is geneID. The views.phenotypeGeneLinkage can then use these IDs to find all instances of data that was obtained using a reagent that targets one of the gene’s transcripts and that exhibits the phenotype.
Please consult the official documentation on Writing Views for a deeper understanding of this section. The functions defined in views.py represent the logic behind the webpages. The view functions (called through the URL matching) decide which data structures need to be constructed and sent through to the HTML templates. To do this, each view function uses Django’s object relational model (ORM) to query the database picking out what is needed for any particular page.
Please consult the official documentation on the Django admin site for a deeper understanding of this section. The classes defined in admin.py tell Django what attributes are visible and modifiable from the admin site.
The current database schema is shown below:
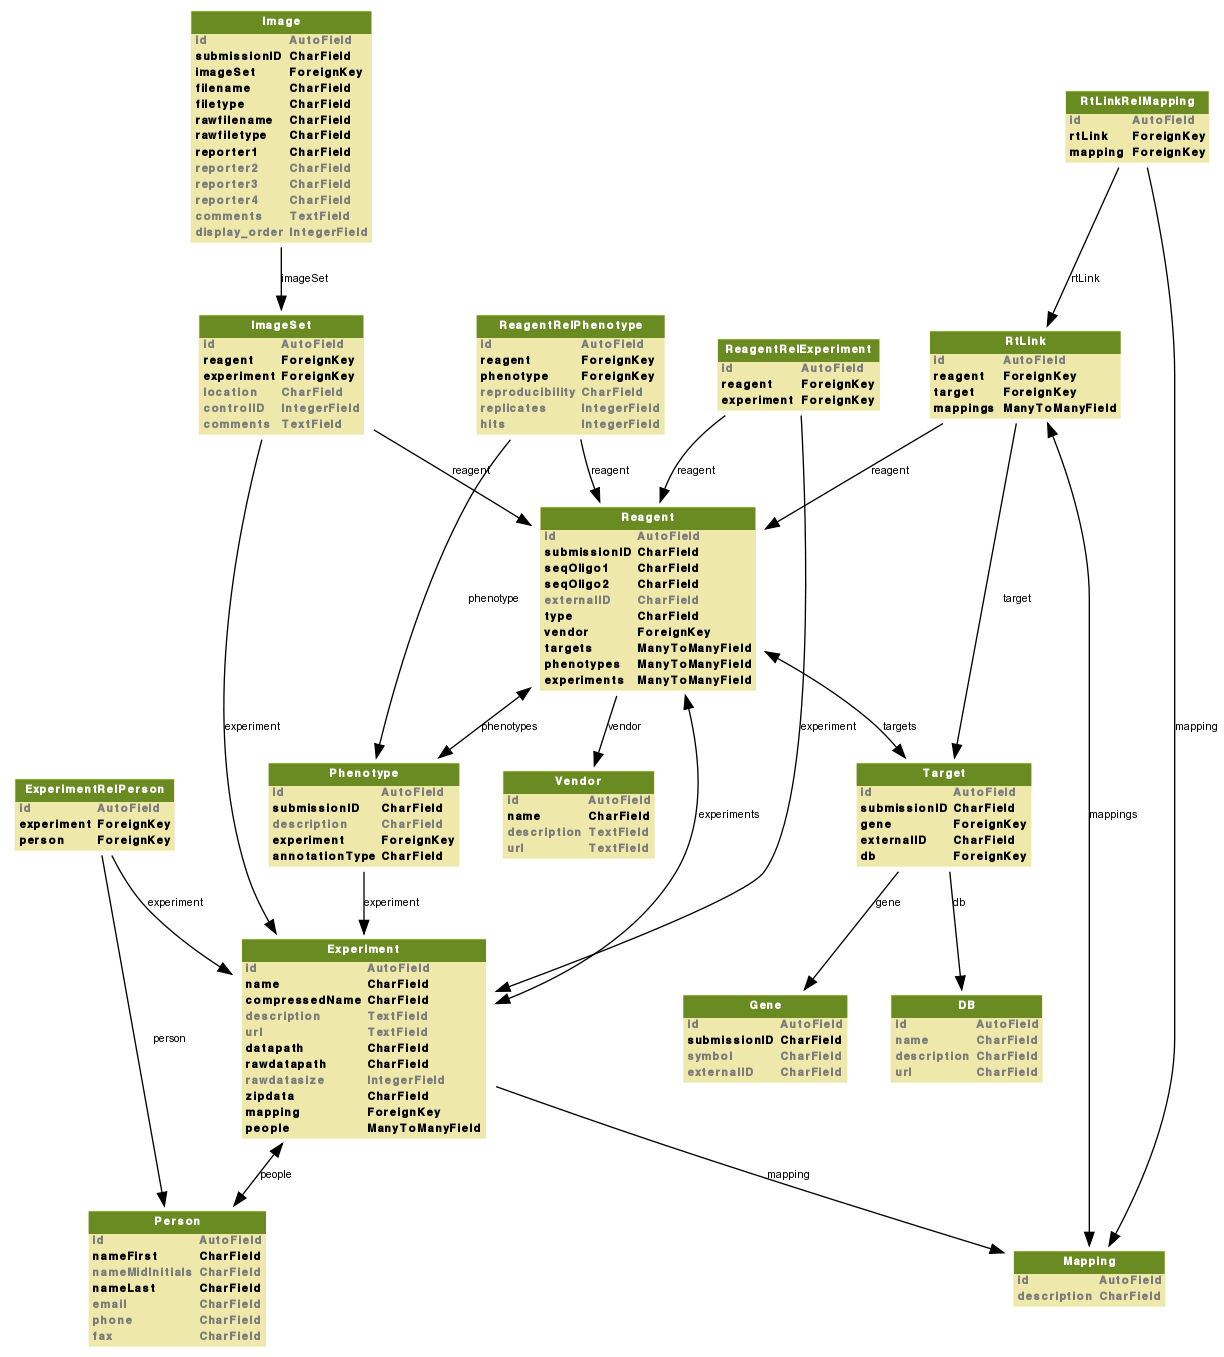
This schema the model attributes and how these models relate to each other. A line with a single arrow-head indicates a ForeignKey or Many-to-One relationship between two objects. As an example, an imageSet belongs to only one experiment but and experiment can contain multiple imageSets. A line with arrow-heads on each end indicates a ManyToManyField or Many-to-Many relationship between two objects. To give an associated example, a reagent can belong to multiple experiments and and experiment can make use of multiple reagents. In these Many-to-Many relationships a relation or Rel model stores each One-to-One relationship on individual rows. With the exception of RtLink, models of this type are named by indicating the models this model forms a relationship between and putting a Rel between these. This way, data that pertains to each One-to-One relationship can be stored. As an example, the ReagentRelPhenotype model indicates which reagent relates to which phenotype and contains extra data about this relationship such as the reproducibility of the phenotype indicated by the number of phenotype hits over the number of replicates done with this reagent. A more complicated example of extra data about a relationship can be seen in the RtLink model. This model includes information about the relationship between any specific reagent/target relationship and which mapping the reagent/target relationship belongs to. This extra relationship is itself of the Many-to-Many form.